1. Installing the plug-in and creating user account
- Please download the plug-in from here.
- Then store the file – for example – on your desktop.
- Be sure Outlook is not running, if it is the case, please stop it.
- Then double-click on the file “SMSAppointmentSetup.msi” to start the installation.
- Follow instructions on the wizard.
Once the plug-in is installed, you can start Outlook. At start, the following dialog should appear:
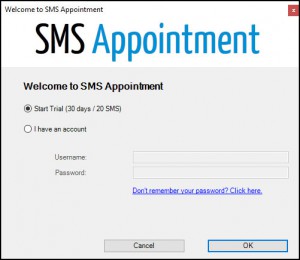
Choose “Start Trial” to immediately create a trial account (you don’t have to enter any credit card information to use the trial account). Then click “OK”, the following dialog should be displayed:

Choose a username, a password, choose your country code and your mobile number. Then enter your email address and choose your preferred data/time format. Click OK, you are done with the setup. Quite easy!
2. Create your first SMS appointment
Now, let’s create our first SMS appointment. Go on the Calendar part of Outlook and create or edit an appointment.
On the toolbar, you will find a new category and a new button “SMS Appointment”:
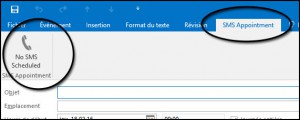
SMS Appointment toolbar and button (in this example using Office 365)
Click on the button and a dialog window will appear:
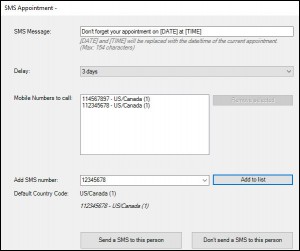
You can customize the default SMS message if needed. Then enter the phone number on which you want to send the SMS to (You can also pick a name/phone number from your address book). Check the “Send a SMS to this person” checkbox, click OK and save your appointment. That’s it.
The SMS will be sent to the person when needed by our service.
Note: The [DATE] and [TIME] tags will be replaced by the date and time of the appointment.
3. Settings
If you want to change SMS Appointment settings, just do the following:
- If you are using Office 2010 or newer, just click FILE then Sms Appointment
- If you are using previous version use menu Tools the SMS Appointment Settings…
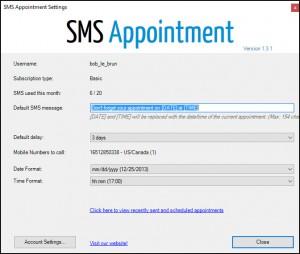
On this window you can change the following:
- Default SMS message: To edit the default SMS message (you can always customize the message for each customers, don’t worry)
- Default delay: Here you can choose the delay to send the SMS. For instance, if you choose “1 day” the SMS will be sent one day before the actual appointment.
- Date Format: Here you can choose the date format used on the SMS (American or European style).
- Time Format: Here you can choose the time format used on the SMS (24h format or 12h format).
- Click here to view recently send and scheduled appointments: click this link to show a report of the last SMS sent and a list of all SMS scheduled.
- Start a subscription… To start a paid subscription if you want to go further with SMS Appointment (sure you want! 🙂 )